Overview
Shadows are a natural way for children to explore how light travels. By placing a colored transparent sheet between a light source and a surface, the shadow itself takes on the color of the sheet. This demonstration is quiet, requires almost no cleanup, and works well in a small classroom or at a kitchen table. It also introduces basic ideas about light wavelengths, color filters, and additive color mixing.
Before You Begin
- Choose a dimly lit room or close the blinds so the light source stands out.
- Use a battery‑operated flashlight, a desk lamp with an exposed bulb, or a smartphone torch. Avoid high‑heat bulbs that could melt thin plastic.
- Adult supervision is required for cutting paper and for handling scissors.
- Gather all materials on a flat surface where the shadow can be projected onto a white sheet of paper or a plain wall.
Materials
- White printer paper (A4 or letter size) – for the projection surface and for making cut‑out shapes.
- Cardboard (a small piece, e.g., a cereal box) – optional base for holding shapes steady.
- Transparent colored sheets – clear cellophane, colored plastic folders, or inexpensive colored transparency film. Aim for primary colors (red, green, blue) and at least one secondary color (yellow).
- Scissors.
- Masking tape or small pieces of double‑sided tape – to attach shapes to the cardboard if desired.
- A flashlight, desk lamp, or smartphone torch.
Procedure
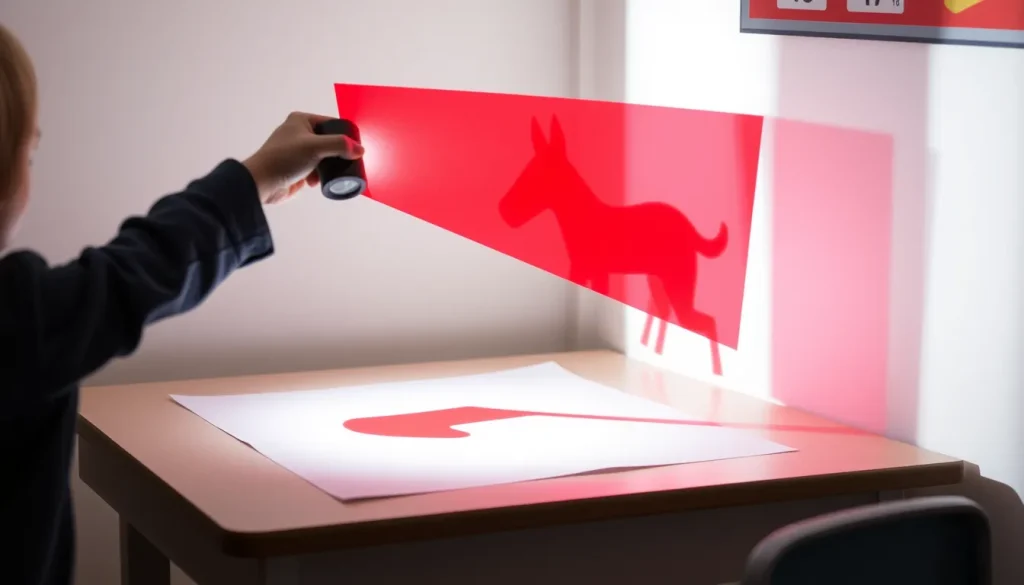
- Cut a simple shape (e.g., a circle or a silhouette of an animal) from the white paper. You will need one shape for each colored sheet you plan to use.
- Place the shape on a piece of cardboard to keep it flat. If you prefer, tape the shape directly to the projection surface.
- Lay a sheet of white paper on a desk or attach it to a wall so it forms a smooth, white background for the shadow.
- Position the light source about 30 cm (12 in) from the white background. Turn it on.
- Hold the colored transparent sheet directly between the light source and the white background, making sure the sheet covers the entire light beam.
- First, use a red sheet. Observe the color of the illuminated area on the white background.
- Now place the paper shape on the cardboard and hold it so its shadow falls on the colored background.
- Notice that the shadow appears tinted with the color of the sheet.
- Repeat steps 5‑6 with each colored sheet (green, blue, yellow, etc.). Record the shadow color each time.
- For a mixing demonstration, overlap two colored sheets (e.g., red over blue) and observe the new shadow hue. Try different orderings to see how additive mixing works.
- Optional extension: Move the colored sheet farther from the light source and note any change in shadow intensity.
What to Observe
Use the table below to record your observations. You can fill it in as a class or have each student keep a small notebook.
| Colored Sheet | Shadow Color Observed | Notes (intensity, edge sharpness, mixing effects) |
|---|---|---|
The Science Explained
White light is a mixture of many wavelengths, each corresponding to a different color. When light passes through a transparent colored sheet, the material acts as a filter: it absorbs (or blocks) many wavelengths and allows only the wavelengths of its own color to pass. The light that reaches the white background is therefore colored.
A shadow is formed where the object blocks the light. In a normal (unfiltered) situation, the blocked area receives no light, so it appears dark. When a colored filter is placed in the beam, the light that still reaches the area behind the object is already tinted. Consequently, the shadow takes on the color of the filter. Overlapping two filters lets the wavelengths from both combine, producing a new hue – an example of additive color mixing. The intensity of the shadow can change with distance because the light beam spreads out, reducing the amount of filtered light that reaches the surface.
Because the demonstration uses thin, flexible materials, there is no mess, no chemicals, and no waste beyond the cardboard and paper that can be recycled after use.
Cleanup and Disposal
- Collect all paper shapes and recycle them with ordinary paper waste.
- If you used reusable colored transparency film, wipe it with a dry cloth and store it for future lessons.
- Turn off the light source and store the flashlight or lamp.
- Dispose of any single‑use plastic wrap in the appropriate recycling bin if your school district accepts it; otherwise, place it in regular trash.
Next Steps
After the demonstration, students can design a simple experiment to test how distance between the filter and the surface affects shadow brightness. They could also explore how mixing more than two colors changes the resulting hue, or compare the effect of opaque colored paper versus transparent colored sheets.
Related terms
- Shadow
- An area where light is blocked by an object, appearing darker than the surrounding surface.
- Color filter
- A transparent material that absorbs certain wavelengths of light, allowing only specific colors to pass through.
- Additive color mixing
- A process where different colors of light combine to produce new colors, such as red and blue making magenta.
Sources & references
- Science Snacks – Colored Shadows, Exploratorium, https://www.exploratorium.edu/snacks