Solar ovens turn sunlight into heat using only everyday items. By building a small oven from a pizza‑box‑style cardboard container, children can explore how different insulation materials affect the oven’s ability to trap and retain heat. This experiment follows the engineering‑design steps used in NASA’s classroom solar‑oven challenge and the U.S. Department of Energy’s pizza‑box guide, while adding a systematic comparison of insulation performance.
Overview
The goal is to answer the question:
Which common insulation material (newspaper, cotton batting, bubble‑wrap, or Styrofoam) produces the greatest temperature increase inside a cardboard solar oven over a ten‑minute exposure to direct sunlight?
Students will construct one oven, swap the insulation layer, and record temperature data with a simple thermometer. The activity integrates physics concepts such as solar radiation, heat absorption, conduction, convection, and thermal insulation.
Before You Begin
- Safety first: Do not look directly at the Sun, and never focus sunlight with a lens. Use a standard kitchen or candy thermometer (no glass). Adult supervision is required for cutting cardboard and handling hot surfaces.
- Weather check: Choose a clear, sunny day with minimal cloud cover. Record the ambient temperature before each trial.
- Workspace: A flat outdoor surface (a patio table or a clean lawn) works well. Keep a notebook, pen, and the data table nearby.
Materials
| Item | Quantity | Notes |
|---|---|---|
| Pizza‑box or similar cardboard box (≈30 × 30 × 4 cm) | 1 | Standard take‑out pizza box works best |
| Aluminum foil | 1 sheet (≈30 × 30 cm) | Reflects sunlight into the oven |
| Black construction paper | 1 sheet (≈30 × 30 cm) | Absorbs solar energy |
| Clear plastic wrap (cling film) | 1 sheet | Creates a greenhouse layer |
| Masking or duct tape | 1 roll | Secures foil and plastic |
| Scissors | 1 | For cutting cardboard and foil |
| Ruler or wooden stick | 1 | To prop open the flap |
| Thermometer (0‑100 °C range) | 1 | Digital or liquid‑filled |
| Insulation samples (choose three or four) | ≈2 cm thick each | Newspaper, cotton batting, bubble‑wrap, Styrofoam |
| Notebook paper & pen | 1 set | Data recording |
All items are inexpensive and can be sourced from home or a local grocery store. The pizza‑box design follows the U.S. Department of Energy’s “Build a Pizza Box Solar Oven” instructions [2] and NASA’s classroom lesson plan [1].

Step‑by‑Step Procedure
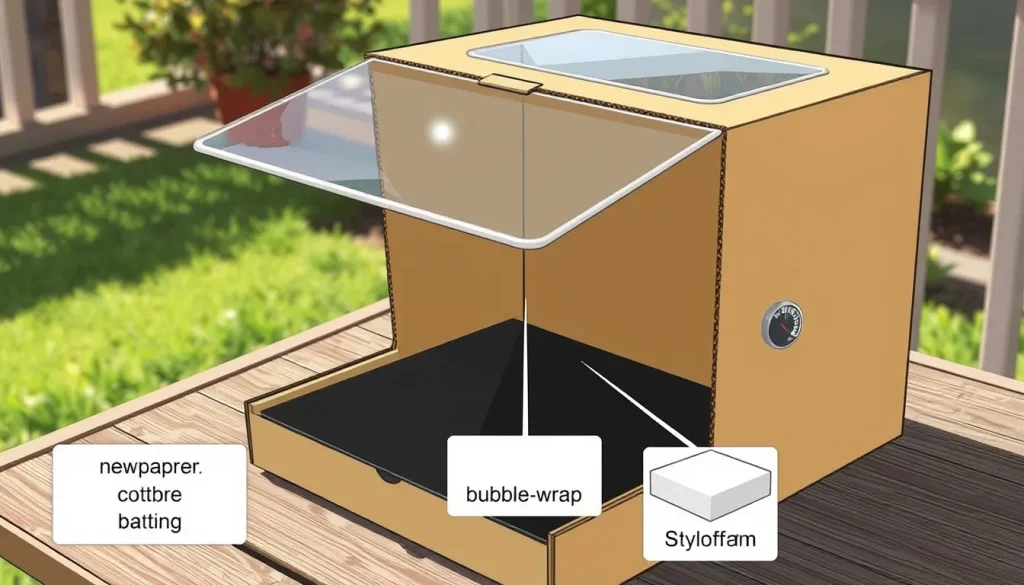
- Prepare the box: Using scissors, cut a flap along three sides of the pizza‑box lid, leaving about 1 cm of cardboard uncut on the back side. Fold the flap outward to create a reflective panel.
- Line the interior: Tape black construction paper to the bottom of the box. This dark surface absorbs solar energy.
- Apply the reflective foil: Cover the inside of the flap with aluminum foil, shiny side out. Secure with tape, ensuring a smooth surface to reflect sunlight.
- Install the first insulation layer: Place the chosen insulation material (e.g., a sheet of newspaper) on top of the black paper, covering the entire bottom area. Tape the edges so it stays flat.
- Seal the oven: Stretch clear plastic wrap over the opening of the box, sealing the edges with tape. The plastic creates a greenhouse effect, trapping heat.
- Position the thermometer: Place the thermometer probe on the black surface, under the insulation, where the food would sit. Record the starting temperature (ambient inside the oven).
- Angle the oven toward the Sun: Prop the foil‑covered flap up with a ruler or stick so that sunlight reflects directly onto the black surface. An angle of about 45° works well on a sunny day.
- Record temperature: Every minute for ten minutes, note the thermometer reading. Write the time and temperature in the data table.
- End of trial: After ten minutes, record the final temperature, then allow the oven to cool before handling.
- Swap insulation: Remove the first insulation, replace it with the next material, and repeat steps 4‑9. Perform at least three trials per material to account for variability.
Testable Question
Which insulation material produces the greatest temperature increase inside the solar oven after ten minutes of direct sunlight?
Hypothesis
Materials with lower thermal conductivity—such as bubble‑wrap or Styrofoam—will keep more heat inside the oven, resulting in a larger temperature rise than porous or conductive materials like newspaper or cotton batting.
Variables and Controls
- Independent variable: Type of insulation material.
- Dependent variable: Temperature increase (°C) after ten minutes.
- Controlled variables:
- Box size and shape.
- Amount and placement of black paper and foil.
- Clear plastic cover thickness.
- Time of day and solar angle (conduct all trials within a 30‑minute window).
- Ambient temperature (record before each trial).
- Thermometer model and placement.
What to Observe or Measure
For each trial record:
- Start temperature (°C) inside the oven.
- Temperature at 5 minutes.
- Temperature at 10 minutes.
- Calculated temperature change ΔT = final – start.
- Weather notes (clouds, wind) and any shading.
Repeated Trials
Conduct at least three independent trials for each insulation type. Randomize the order of materials (e.g., newspaper, Styrofoam, bubble‑wrap, cotton) to reduce systematic bias caused by changing sunlight intensity over the testing period.
Data Table
| Trial # | Insulation | Start Temp (°C) | Temp @ 5 min (°C) | Temp @ 10 min (°C) | ΔT (°C) | Notes |
|---|---|---|---|---|---|---|
| 1 | ||||||
| 2 | ||||||
| 3 |
Graphing Your Results
Plot a bar graph with Insulation Type on the horizontal axis and Average ΔT (°C) on the vertical axis. Error bars can show the range of the three trials. This visual makes it easy to see which material performed best.
The Science Explained
Solar ovens work by converting sunlight—electromagnetic radiation—into heat. The process involves three key steps:
- Absorption: Dark surfaces (black construction paper) absorb a wide range of wavelengths, turning photon energy into thermal energy.
- Reflection: Aluminum foil redirects sunlight that would otherwise miss the absorber, increasing the amount of energy that reaches the black surface.
- Greenhouse effect: The clear plastic wrap is transparent to visible light but traps infrared radiation emitted by the heated black surface, preventing heat loss by convection.
Insulation slows the flow of heat from the inside of the oven to the surrounding air. Materials with low thermal conductivity (e.g., bubble‑wrap, Styrofoam) trap more heat, while porous or fibrous materials like newspaper allow heat to escape more readily. This experiment lets students see the quantitative effect of those differences.
The underlying physics aligns with the concepts presented in NASA’s classroom lesson, which emphasizes temperature measurement and design iteration [1]. The pizza‑box design and data‑collection approach are also described by the U.S. Department of Energy [2], while the broader educational context of using cardboard, foil, and Plexiglas for solar‑oven projects is discussed in TeachEngineering’s “Cooking with the Sun” module [3]. A practical guide to measuring oven efficiency, including the same basic materials, is offered by Technifyed [4].
Troubleshooting
- Temperature rise is very low (≤2 °C): Check that the foil is smooth and fully reflective; ensure the plastic wrap is sealed without gaps; verify the oven is angled directly toward the Sun.
- Thermometer reads unusually high values: Make sure the probe is not touching the foil or the metal edge, which can conduct heat.
- Inconsistent results between trials: Record wind speed and cloud cover; repeat trials in a calmer period or use a windbreak.
- Insulation seems to melt or deform: Use only low‑temperature‑resistant materials (e.g., avoid thin plastic bags that can soften).
Cleanup and Disposal
After the experiment, recycle the cardboard box and aluminum foil if possible. Newspaper and cotton batting can be composted or discarded. Bubble‑wrap and Styrofoam are best placed in the appropriate recycling stream where available.
Next Steps
Encourage curious learners to extend the investigation:
- Vary the angle of the reflective flap and record its effect.
- Test additional insulators such as wool, shredded newspaper, or a thin layer of sand.
- Measure how long the oven can keep a temperature above 40 °C, which is enough to melt chocolate for s’mores.
- Design a second‑generation oven that combines the best insulation with a larger reflective surface.
These extensions reinforce the engineering design cycle—design, test, analyze, improve—highlighted in NASA’s lesson plan.
Sources & references
- NASA – Cooking with the Sun: Build a Solar Oven (PDF), https://www.nasa.gov/wp-content/uploads/2024/02/nasa-lp-solar-oven.pdf?emrc=66f923
- U.S. Department of Energy – Build a Pizza Box Solar Oven, https://www1.eere.energy.gov/education/pdfs/lesson298.pdf
- TeachEngineering – Cooking with the Sun – Creating a Solar Oven, https://oercommons.org/courses/cooking-with-the-sun-creating-a-solar-oven-2
- Technifyed – Build a solar oven and measure its efficiency, https://technifyed.com/project/build-a-solar-oven-and-measure-its-efficiency